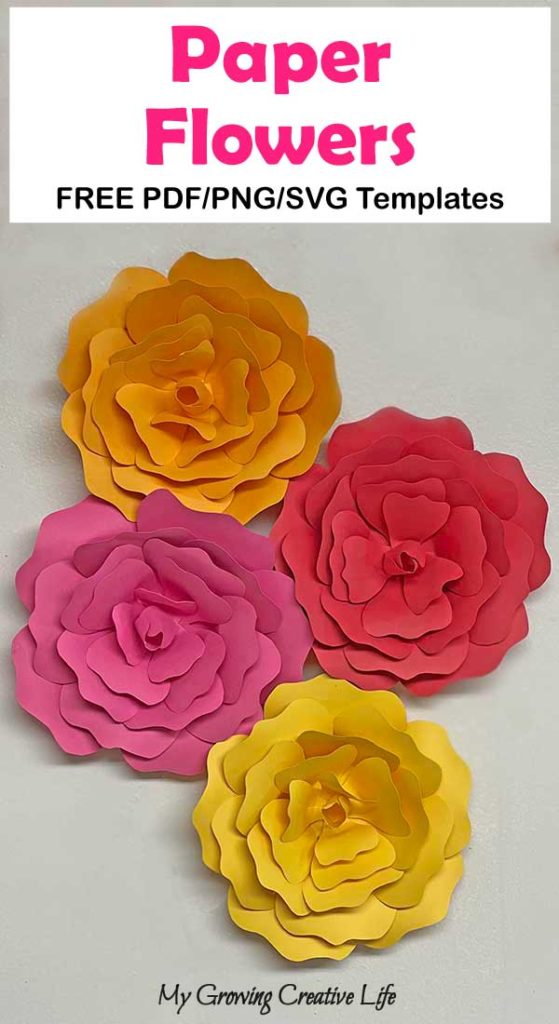
Ok, who’s ready for spring and warm weather. Living in NYC, I’m certainly ready for some warmth and gardening, especially the flowers. I started this project last year when I was hoping for spring and then things got a bit crazy due to the pandemic. Spring forward a year (pun intended), and I finally have my paper flower template finished and ready to share with you. I wanted to create a flower that was easy to make with or without a cutting machine using basic tools from your craft stash or house. It also needed to look pretty and elegant. I think this flower accomplishes both. Hope you feel the same way. Enjoy!!
Material Tips:
Download the FREE Paper Flower Template HERE (PDF, PNG, SVG). TIP: For the png file, if it displays in your browser, select Save Page As/Save As and you can save the png file to your computer.
1 – Option A (Cutting the petals out by hand). If you are cutting out the flower petals by hand like I did, print out the template on cardstock paper (in the contrasting color). Cut out each petal and base template. NOTE: After I took these pictures I added the number of petals needed INSIDE each petal, so its easier to keep track of how many to cut of each.
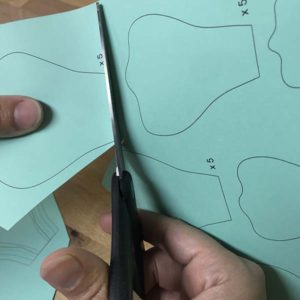
1 – Option B (Using a cutting device to cut out the petals). If you are using a cutting device, like a Cricut, to cut out the petals, delete the number of petals from the inside of each petal and lay out the petals for the device. Once cut, skip to Step 3.
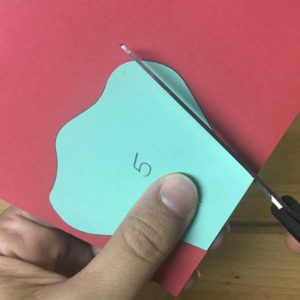
2. Using each template petal, cut out the flower petals from the other 2 sheets of paper. TIP: I prefer to double up the paper and cut 2 petals at once whenever I can to save time and effort.
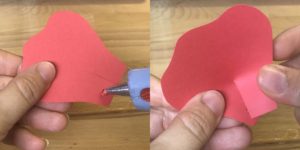
3. After all of the petals and the circle base are cut out, cut a slit in the base of the single petals, about 1/3 of the way up.

4. Add a drop of hot glue to the bottom left corner of a single petal. Gently pull the bottom right corner over the left corner and press them together until the glue is cooled and holds. This will help the petal pop up off of the base.
Continue with all of the other single petals until all of the bottoms are glued together.

5. Next we want to add a bit of life and individuality to each petal. Using a highlighter, marker, or sharpie, roll the back of the petal over it gently to create some curl.

6. Curl both outside edges of each petal as well to give them more movement.

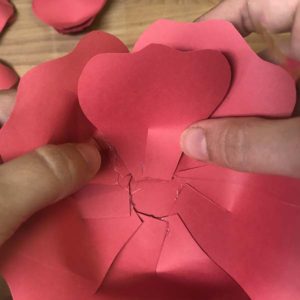
7. Once all of the petals are curled it’s time to create the paper flower. Starting with the largest petals, add a bit of glue to the back of one (where you overlapped the paper) and attach it to the edge of the base.

8. Repeat this with the other petals of that size, going around the base. Be sure to slightly overlap each petal with the one before it. When you get to the last petal make sure to tuck a bit under the first petal, so you cannot tell where you started and finished.

9. Take the second largest group of petals and repeat this process (steps 7 and 8). Be sure to start the first petal of the second layer in the middle of 2 petals from the first layer. It makes the flower look fuller and more lifelike. Move the ring of petals in slightly to form a smaller circle than the first layer of petals.
10. Repeat the process with the last group of 5 petals to create the third layer.

11. Glue the group of 4 petals down to create the fourth layer. Rotate each petal 90 degrees, so they are evenly distributed around the layer.

12. Glue the group of 3 petals down to complete the fifth and final layer. Rotate each petal so they are evenly distributed (120 degrees).

13. Take the double petal piece, which is the center of the flower, and curl the edges with a pencil. Be sure to curl all 4 edges inward as the 2 petals will be folded in. Add a drop of glue to the outside edge of one of the petals and press the edge of the other petal over it to create one side of the closed bud/center.

Repeat the drop of glue on the other side. The goal here is to not be perfect because no real flower is.
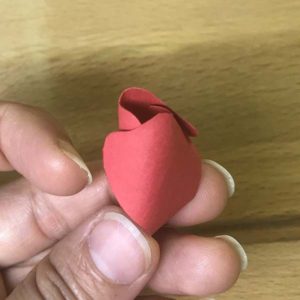
14. Turn the bud over so you are looking at the bottom. I like to flatten the bottom out a bit before gluing down, so it sits better, especially while it’s drying. Once flattened out, add some glue to the bottom and press into the center of the paper flower.

Once the glue dries, let go and TADA! Such a pretty paper flower!

I hope the paper flower template was easy to use and that your new flower (or flowers) make you smile as much as they make me smile!